Why NixOS Should Replace Your Server OS

Author: Hayden Hargreaves
Published: 10/11/2026
Background
I have been "homelabbing" for the better part of five years, and in those years I have tried countless setups. First I used a "raw" (no automation tools) Ubuntu, which I used for a while until one of my college professors pointed out a huge problem: what happens if the server dies? All the applications, state, and configuration are gone and since most of the configuration was done months or years ago, it has left my "mental context." This exposed a real problem in my architecture: a lack of reproducibility.
After this realization, my professor recommended a tool called Ansible. Ansible is an automation tool that allows you to configure an operating system remotely. It allows a server admin to automate repetitive tasks like software deployment, cloud provisioning, system updates and even network management all through a simple YAML API.
Ansible is classified as Infrastructure as Code, but I would consider it "Configuration as Code"
While Ansible is a powerful tool, it is not my preferred solution. Ansible uses an iterative procedural approach via playbooks over an SSH connection. The individual modules within a task are idempotent but not fully state-aware. This works well for small environments or for simple tasks, like executing an update or adding a package, but for large server stacks with dozens of applications, this approach becomes cumbersome. State drift is another concern. When using Ansible your server is not "managed" by Ansible which means you could connect to the server and make a change, one that Ansible cannot see, and then your configuration will be out of sync. Which can be a huge challenge when debugging issues.
That leads me to the most recent migration in my homelab: NixOS. I have been using NixOS on my personal desktop and laptop for nearly three years and have grown to love it. NixOS is a Linux distribution built around the Nix package manager. A system's configuration is declarative which means you define exactly how the system should look and exactly how NixOS should build it. Furthermore, configurations can be built consistently on compatible systems.
There are many more benefits of using NixOS, but you can learn more here.
Why I Switched
I highlighted a few of the key reasons I switched from a Debian + Ansible setup to a NixOS setup, but there are many more. Some examples will follow this section to help clear up any confusion.
Reproducibility
This is the selling point of NixOS: the ability to rebuild a configuration on compatible hardware is severely underrated (until the moment you wish you had it). Imagine you have years of configuration stored on a server and the storage suddenly fails. With NixOS, you can rebuild the operating system on new hardware using the same configuration and a new hardware configuration file. You will still need to restore persistent application data and secrets separately.
About a month before writing this post I began a major overhaul of my homelab (which will be described in depth later) which involved increasing the machine count from one to three. I took this opportunity to push my NixOS skills to the max: installing NixOS onto many servers and managing them all via a single stored repository (more on this later).
First, I tried the system with a blank configuration on a traditional x86 system and spent a few days setting it up and configuring the system. Once it was working as expected, which only took a few hours, I installed NixOS onto a Raspberry Pi 4 I now use as a monitoring tool. Setting up the Pi was as simple as building the system to a new remote location. The system was set up, configured, and applications installed in mere seconds, using the same exact configuration.
A similar result can be achieved using Ansible with a traditional Linux operating system, but it's much easier to make a mistake, lose a file, or simply misconfigure something. Furthermore, the amount of code in my "bootstrap" Ansible playbook is nearly four times larger than my entire multi-system nix configuration.
Ghost State
One of the biggest headaches I encountered when using Ansible is ghost state. For example, say I deployed an Nginx web server, then a few days later I remove it from the configuration. The server will still be running that same web server. Meaning the state of the configuration and server are effectively disconnected. Over time, these small "ghosts" compound and soon your server will be filled with unused packages, stale configurations, open firewall ports and applications you thought weren't around anymore.
NixOS solves this problem by only building what is declared in the configuration. If you remove a package from your package list, it is no longer part of the next system build. A service that was disabled gets removed from the generation. The configuration matches the build exactly, and unused store paths can be removed with garbage collection.
Instant Rollbacks
Another strength of the NixOS operating system is the ability to roll back any change. Let me pose another hypothetical scenario: you are working on a configuration and you accidentally remove the line to enable your display manager, but you don't notice. After the rebuild, everything still works fine, but when you reboot the system everything changes. You can't see anything and your system is effectively "bricked."
On a traditional Linux system, what would you do? Somehow get shell access? What if you can't? What if somehow you deleted your terminal? Reinstall your operating system then? Not with Nix! NixOS stores a list of generations which are snapshots of your previous configurations which can be reloaded at any point from the boot menu. This simple feature allows you to "unbrick" any system at any point with zero effort.
During my server migration, I did something very similar: I disabled SSH access by accident. The server I was working on does not have a graphics card or any display access. So how would I fix this? In the past, I have (many times) had to take the server out of the rack, install a GPU I had laying around, and connect it to a monitor so I can debug it manually. However, with this configuration, all I had to do was plug in a keyboard and turn the machine on, wait a few seconds, hit the down arrow and enter key. Boom! All of a sudden the system booted with SSH access again, I was able to adjust the configuration and rebuild it to resolve the problem.
This entire resolution process took less than five minutes and saved me over an hour of hardware changes and pulling the rack out of the closet.
A Single Declarative Configuration
Your NixOS configuration files are written using the Nix programming language, shocker right? Nix is a domain specific language (DSL) designed for "conveniently creating and composing derivations – precise descriptions of how contents of existing files are used to derive new files" (taken from the Nix documentation). At its core, Nix is a functional programming language designed for simplicity and configuration.
Writing Nix is fairly simple, and examples can be found all over the internet, so I would not let the language itself be a reason not to try NixOS. You will experience some trouble at first; one common complain with nix is that the syntax is initially strange. But with some time and practice, you will get the hang of it.
But back to the point: a single declarative configuration. But what does declarative mean? In our context, declarative programming is a "paradigm that expresses what a program should achieve rather than how to achieve it step by step." This directly addresses the problems listed above regarding ghost state. Instead of defining how something is done, we simply tell Nix to just do it. This will become painfully obvious in the following section where I show off some examples of my configuration.
The last crucial point is that a single configuration repository can define many different
systems. Using flakes allows you to define many
systems in a single repository and each system can be configured using the same source,
regardless of their architecture. Below you can see my flake.nix file that defines two
systems: hermes and hydra, the Raspberry Pi and a NAS server.
# flake.nix
{
  description = "Homelab Configuration";

  inputs = {
    nixpkgs.url = "github:NixOS/nixpkgs/nixos-unstable";

    disko = {
      url = "github:nix-community/disko";
      inputs.nixpkgs.follows = "nixpkgs";
    };
  };

  outputs = { nixpkgs, disko, ... }@inputs: {
    nixosConfigurations.hydra = nixpkgs.lib.nixosSystem {
      system = "x86_64-linux";

      specialArgs = { inherit inputs; };

      modules = [
        disko.nixosModules.disko
        ./hosts/hydra
      ];
    };

    nixosConfigurations.hermes = nixpkgs.lib.nixosSystem {
      system = "aarch64-linux";
      specialArgs = { inherit inputs; };
      modules = [ ./hosts/hermes ];
    };
  };
}
Once the nixosSystem sees the modules, it will then load the default.nix file defined
in the target directories. With that, you can begin using flakes to configure your servers
with shared code.
nixpkgs Ecosystem
Anyone who uses a Linux operating system knows that the package manager can make or break your experience using the OS. Arch Linux is known for being the operating system with the "biggest" package list, however, that's not entirely true. As seen on the chart below, the nixpkgs repository contains more fresh packages and in the case of nixpkgs-unstable, contains significantly more overall packages.
A fresh package is a package whose version matches the latest known upstream release.
All this to say; if you want an application, the nix package manager has it. If you need an older version, it's simple to create a flake that pins the package version to your target version. Meaning you can get a package of any version and even have two versions of the same application running side by side in separate flakes. This concept of running development shells and pinning nixpkg versions is out of scope for this post, since it doesn't have a real use case in a server environment.
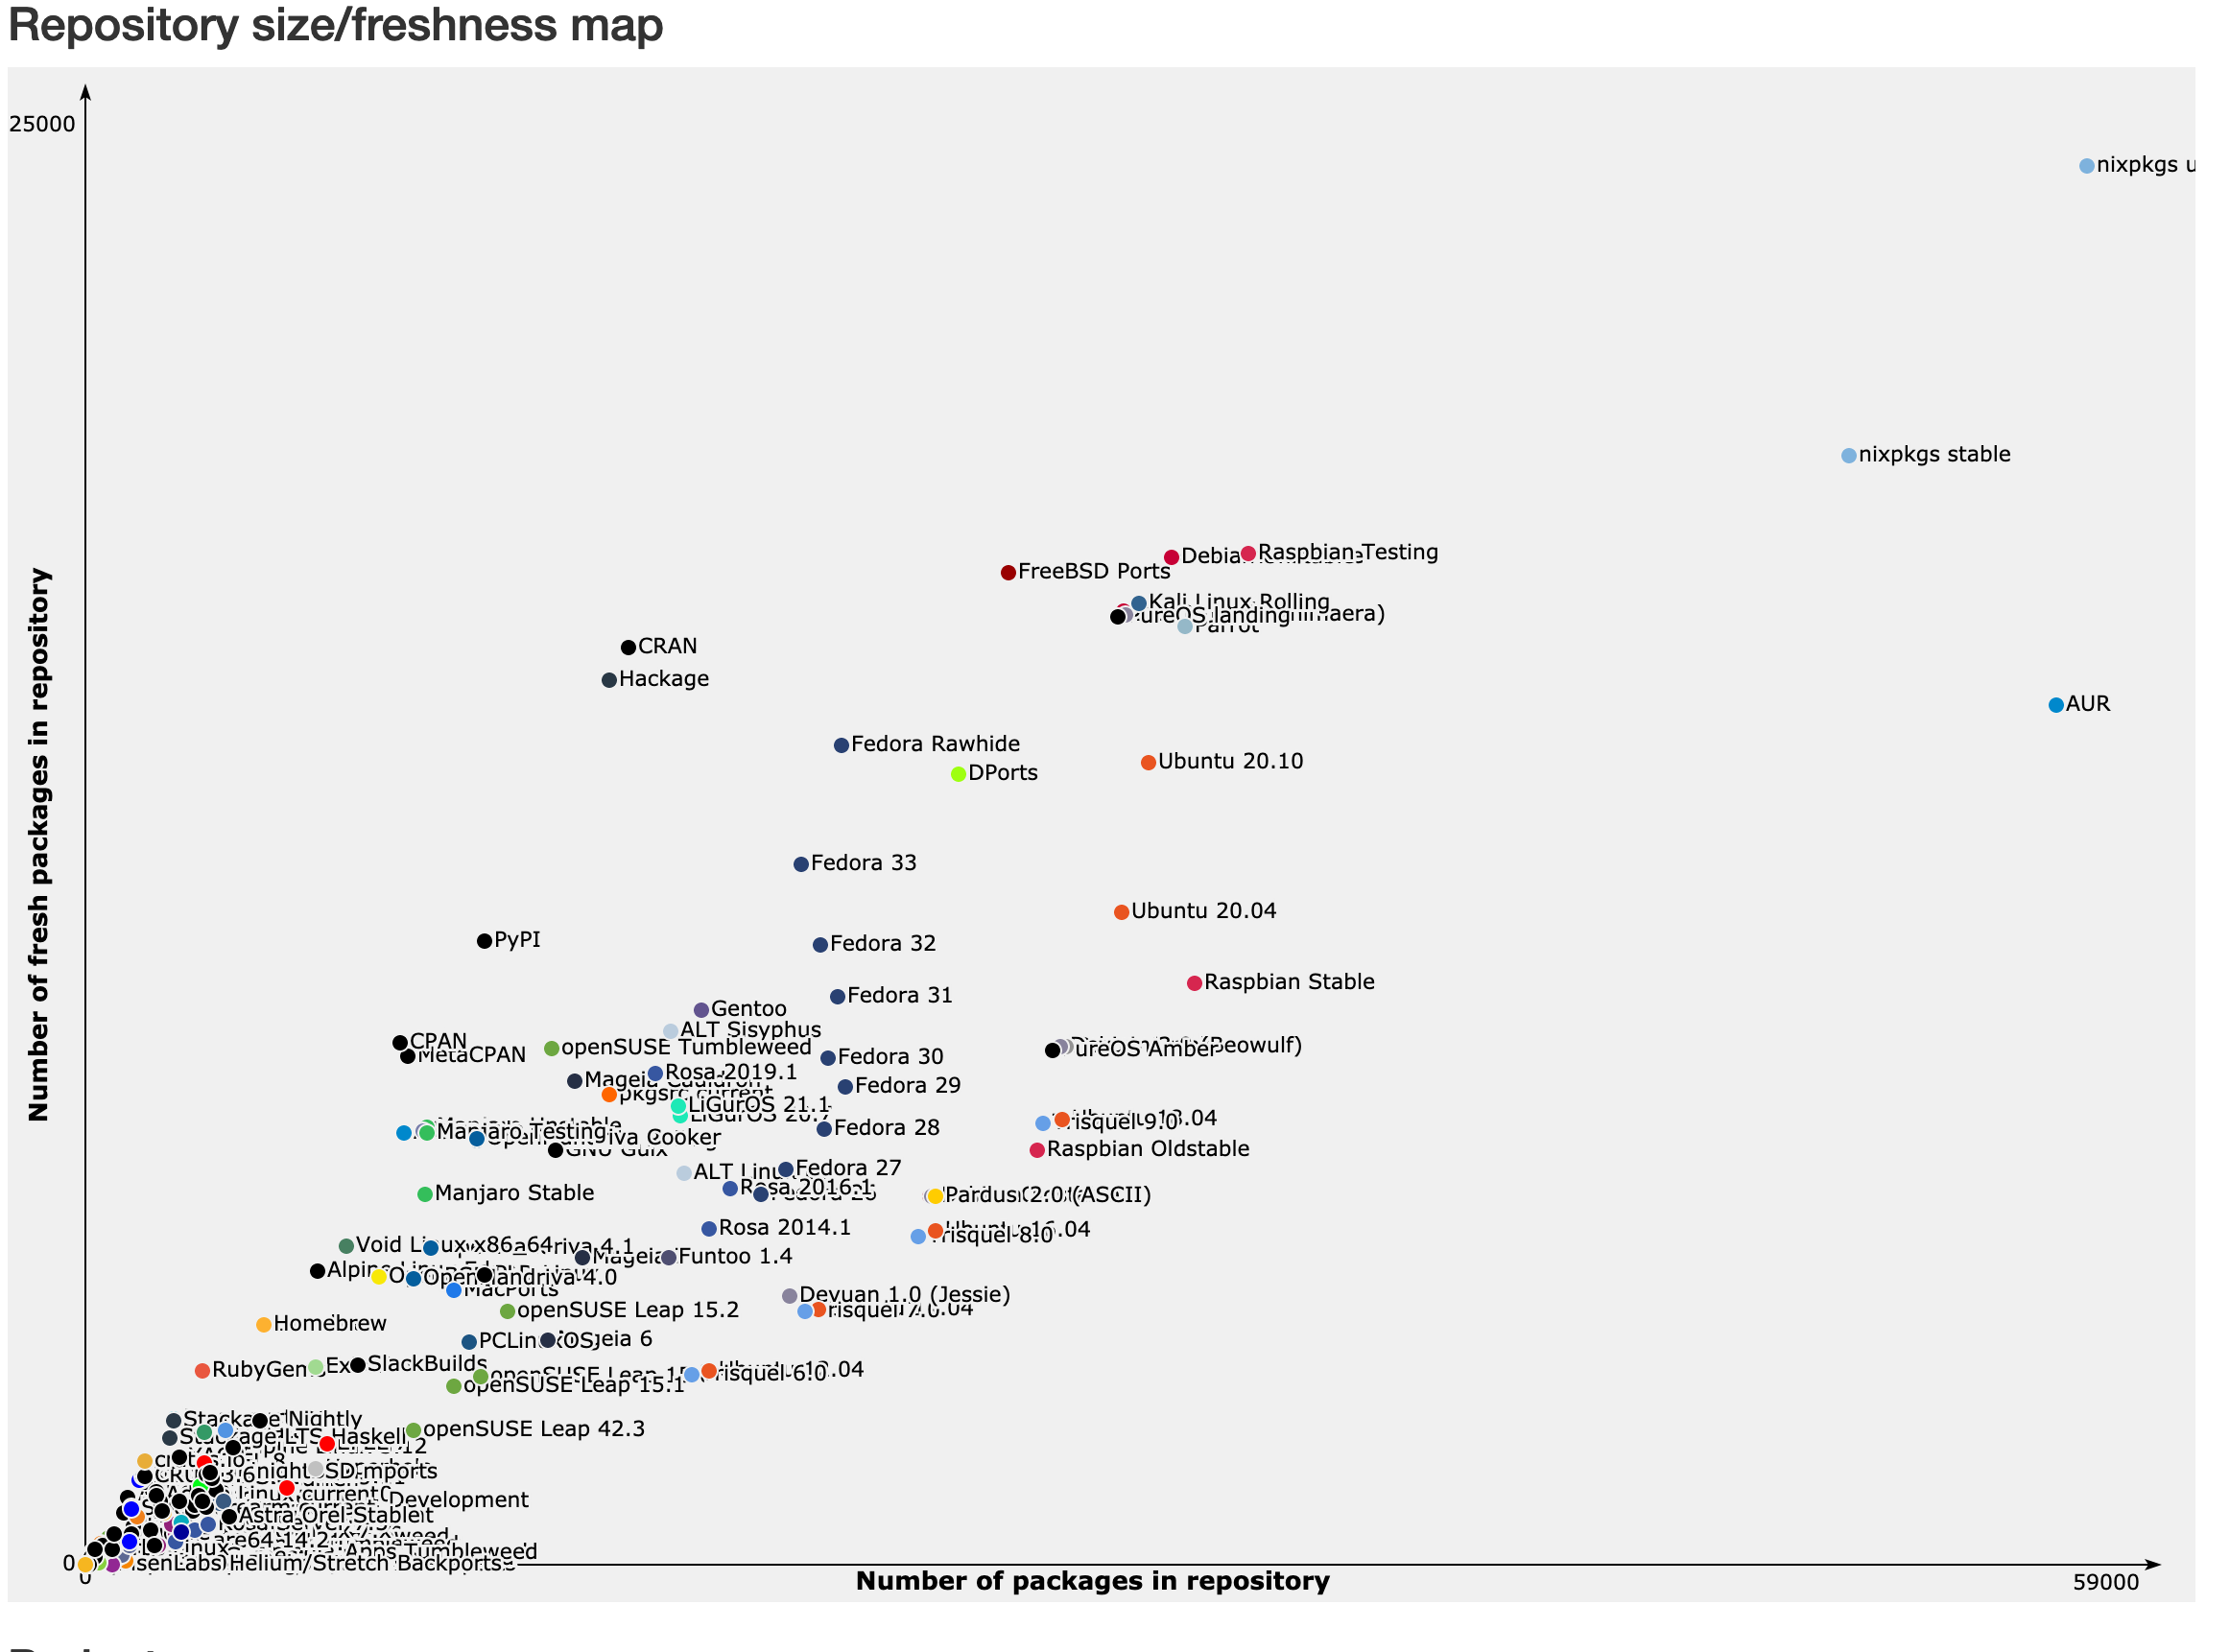
image source: NixOS Discourse
Remote Builds
A common workflow when managing a Linux server manually is to SSH into the device, make changes, document them (hopefully) and then disconnect. Using Ansible automates the manual SSH process by doing the connection and changing part for you. Ansible is agentless, meaning it does not require the target server to have any specific software (the agent) installed. A common NixOS server workflow is very similar to that of a traditional Ansible workflow.
NixOS provides two main options for deploying your configuration changes. For users who use NixOS on their local machine (like me), the build command should be very familiar:
nixos-rebuild switch \
  --flake .#flakeName \
  --target-host user@hostname \
  --build-host user@hostname \
  --use-substitutes
Use --flake when using flakes, --target-host to specify where to deploy the new
configuration, and --build-host to build it remotely. Omit --build-host for a local build.
The power comes from the ability to either build the configuration and system locally and then copy it to the target server, or push the configuration to the server for it to build. This is especially powerful when the host system and target server do not have matching architectures or when your host machine is significantly more powerful than the target server.
For users not using NixOS on their host machine, it's a bit clunkier, but still totally possible. All the more reason to switch to NixOS on your desktop as well! There are countless guides and resources online that can help you build your system and push it to the server, so I won't go into depth here.
To summarize: a non-nix machine must have the nix package manager installed (not NixOS) and it must have SSH access to the target server. Then your nix configuration can be updated to use a tool like deploy-rs to deploy the configuration to a remote system.
Ansible to Nix Examples
For security purposes, I keep my configuration repository private on my own self-hosted Git server. While I cannot provide a link to the entire source (maybe someday), I will show a handful of examples of the code that changed during the migration process. My hope is that by seeing the difference you will be encouraged to give it a try.
Base System Configuration
Each system has a /hosts/HOST/default.nix file which looks like this:
# hosts/hydra/default.nix
{ ... }:

{
  imports = [
    ./hardware-configuration.nix # Automatically generated with the nixos-generate-config command
    ./disks.nix
    ../../modules/base
    ../../modules/services

    ../../modules/services/immich.nix
    ../../modules/services/unifi.nix
    ../../modules/services/nextcloud.nix
    ../../modules/services/beszel-agent.nix
  ];

  # Use the systemd-boot EFI boot loader.
  boot.loader.systemd-boot.enable = true;
  boot.loader.efi.canTouchEfiVariables = true;
  boot.swraid.enable = true; # Enable software RAID

  networking.hostName = "hydra";
}
Inside the modules/base/ directory there is a default file which imports the following files:
# modules/base/packages.nix
{ pkgs, ... }:
{
  environment.systemPackages = with pkgs; [
    vim
    fastfetch
    git
    neovim
    eza
    lsof
    btop
    fzf
    tree
  ];
}
# modules/base/ssh.nix
{ ... }:
{
  services.openssh = {
    enable = true;
    settings = {
      PermitRootLogin = "prohibit-password";
      PasswordAuthentication = true;
    };
  };

  users.users.root.openssh.authorizedKeys.keys = [
        "..."
        "..."
  ];
}
# modules/base/users.nix
{ pkgs, ... }:
{
  # Don't forget to set a password with passwd
  users.users."username" = {
    isNormalUser = true;
    description = "...";
    extraGroups = [ "networkmanager" "wheel" "docker" ];
    packages = with pkgs; []; # Install user-specific packages here
    shell = pkgs.zsh;
  };
}
There are some more general configuration and some NixOS specific things in various other files, but those examples should give you a good idea of what goes on in there.
Service: Immich
Originally my Immich server lived on the Debian + Ansible server. But when I set up the new NAS server with a four disk RAID configuration, I moved it to Hydra. Originally, I set up Immich with the following Ansible code:
# .../tasks/main.yml
---
- name: Ensure application directory exists
  file:
    path: /home/{{ ansible_user }}/docker/immich
    state: directory
    owner: "{{ ansible_user }}"
    group: "{{ ansible_user }}"
    mode: "0755"
  tags: [immich, exist]

- name: Deploy Docker Compose file
  ansible.builtin.template:
    src: templates/docker-compose.yml.j2
    dest: /home/{{ ansible_user }}/docker/immich/docker-compose.yml
    mode: "0644"
  tags: [immich, docker]

- name: Deploy .env file
  ansible.builtin.template:
    src: templates/.env.j2
    dest: /home/{{ ansible_user }}/docker/immich/.env
    mode: "0644"
  tags: [immich, docker]

- name: Start immich
  community.docker.docker_compose_v2:
    project_src: /home/{{ ansible_user }}/docker/immich
    state: present
  tags: [immich, start]

- name: Allow incoming connections to immich port
  ufw:
    rule: allow
    port: "2283"
    proto: tcp
  tags: [immich, ufw, allow]
And of course the 70-line default docker-compose.yml file that I won't bore you with.
But after migrating to NixOS the configuration is as simple as this:
# modules/services/immich.nix
{ ... }:
let
  vars = import ../vars/default.nix;
in
{
  services.immich = {
    enable = true;
    host = "0.0.0.0";
    port = vars.immichPort;
    mediaLocation = vars.immichPath;
    openFirewall = true;
    user = "immich";
    group = "immich";
  };

  systemd.tmpfiles.rules = [
    "d ${vars.immichPath} 0775 immich immich -"
    "Z ${vars.immichPath} 0775 immich immich -"
  ];
}
It would work with just the services.immich.enable = true line, but I like to keep things
very segregated and secure on my system, so I have defined some abnormal ports and user
configurations.
Service: Nextcloud
For the same reason, I migrated my Nextcloud instance to Hydra as well. Below is the comparison between Ansible and Nix.
# .../tasks/main.yml
---
- name: Ensure deployment directories exist
  ansible.builtin.file:
    path: "{{ item }}"
    state: directory
    mode: "0755"
  loop:
    - "{{ base_dir }}"
    - "{{ base_dir }}/data"
    - "{{ base_dir }}/db"
    - "{{ base_dir }}/redis"

- name: Deploy Docker Compose file
  ansible.builtin.template:
    src: templates/docker-compose.yml.j2
    dest: "{{ base_dir }}/docker-compose.yml"
    mode: "0644"

- name: Spin up Nextcloud stack
  community.docker.docker_compose_v2:
    project_src: "{{ base_dir }}"
    state: present

- name: Install acl package
  apt:
    name: acl
    state: present

- name: Grant Nextcloud user (UID 33) access to the external drive
  ansible.posix.acl:
    path: "{{ item }}"
    entity: 33
    etype: user
    permissions: rwx
    state: present
    recursive: yes
  loop: "{{ nextcloud_drives }}"

- name: Set default ACL for new files on the drive
  ansible.posix.acl:
    path: "{{ item }}"
    entity: 33
    etype: user
    permissions: rwx
    state: present
    default: yes
  loop: "{{ nextcloud_drives }}"
And again, another 50-line docker-compose.yml file that is also managed via Ansible.
In this case, the NixOS alternative isn't much shorter in terms of lines of code, but it's
much easier to read and understand.
# modules/services/nextcloud.nix
{ config, pkgs, ... }:
let
  vars = import ../vars/default.nix;
in
  {
  services.nextcloud = {
    enable = true;
    hostName = "HOSTNAME";

    package = pkgs.nextcloud35;

    database.createLocally = true;
    configureRedis = true;

    config = {
      dbtype = "pgsql";
      adminuser = "username";
      adminpassFile = "...";
    };

    settings = {
      overwriteprotocol = "https";
      trusted_proxies = [ "127.0.0.1" "0.0.0.0" ];
    };

    extraOptions = {
      "default_phone_region" = "US";
      "maintenance_window_start" = 1;
    };
  };

  services.nginx.virtualHosts."${config.services.nextcloud.hostName}".listen = [
    { addr = "0.0.0.0"; port = vars.nextCloudPort; }
  ];

  systemd.tmpfiles.rules = [
    "d ${vars.nextCloudPath} 0775 nextcloud nextcloud -"
    "Z ${vars.nextCloudPath} 0775 nextcloud nextcloud -"
  ];

  networking.firewall.allowedTCPPorts = [ vars.nextCloudPort ];
}
Once again, a lot of the options provided here are unique to my situation. If you just need
a local Nextcloud instance, the simple services.nextcloud.enable = true line
would work just fine.
Service: Beszel
One of the more recent upgrades has been adding Beszel monitoring to the Raspberry Pi. The purpose of the Pi was to serve as a lightweight monitoring solution for the other two servers. Beszel is my tool of choice (along with Gatus for uptime monitoring).
Here is the Ansible task to deploy the Beszel hub and agent on a single machine:
# .../tasks/main.yml
---
- name: Create Beszel Data Directory
  file:
    path: /opt/beszel_data
    state: directory
    mode: "0755"
  tags: [beszel, exist]

- name: Deploy Beszel Hub
  community.docker.docker_container:
    name: beszel-hub
    image: henrygd/beszel:latest
    state: started
    restart_policy: unless-stopped
    ports:
      - "{{ beszel_hub_port }}:8090"
    volumes:
      - /opt/beszel_data:/beszel_data
    env:
      APP_URL: "{{ beszel_app_url }}"
  tags: [beszel, docker]

- name: Deploy Beszel Agent
  community.docker.docker_container:
    name: beszel-agent
    image: henrygd/beszel-agent:latest
    state: started
    restart_policy: unless-stopped
    network_mode: host # Best for getting accurate host metrics
    volumes:
      - /var/run/docker.sock:/var/run/docker.sock:ro
    env:
      KEY: "..."
  tags: [beszel, docker, agent]

- name: Open Beszel Agent port
  community.general.ufw:
    rule: allow
    port: "45876"
    from_ip: "local ip"
    proto: tcp
  tags: [beszel, ufw, allow]

- name: Open Beszel Agent port for Docker Bridge (Internal)
  community.general.ufw:
    rule: allow
    port: "45876"
    from_ip: "local docker subnet"
    proto: tcp
  tags: [beszel, ufw, allow]
This time we didn't need a docker compose template, but it's still pretty messy. The Nix configuration was split into two separate pieces, so that the Pi can run the agent/hub combo but the target servers only need the agent.
# modules/services/beszel-hub.nix
{ ... }:
let
  vars = import ../vars/default.nix;
in
{
  services.beszel.hub = {
    enable = true;
    host = "0.0.0.0";
    port = vars.beszelHubPort;
  };

  networking.firewall.allowedTCPPorts = [ vars.beszelHubPort ];
}

#modules/services/beszel-agent.nix
{ ... }:
{
  services.beszel.agent = {
    enable = true;
    openFirewall = true;

    smartmon.enable = true; # Enable SMART checking on the drives

    environment = {
      KEY = "..."; # Each agent can share the same key
    };
  };
}
These handful of lines are able to execute the same functionality, with more control and more configuration options than the above Ansible task.
Configuration as Code vs. Infrastructure as Code
By definition Ansible is "used within an infrastructure as code" workflow. However, I wanted to express a new opinion I heard last summer during my internship at Garmin. I was chatting with the DevOps team one afternoon about my server and some ideas we had for a project and I mentioned my knowledge of Ansible. After briefly explaining the tool, one team member asked me: "Is that really infrastructure as code?" This made me think back to a time when I had a very similar conversation with another technical peer about the difference between Ansible and Terraform. Having never used Terraform, I had a hard time comparing the two, but I now understand the key differences and draw this simple analogy: Ansible = software configuration and Terraform = cloud hardware configuration.
That's when the DevOps guy I was chatting with said something that changed the way I describe Ansible:
"That sounds like configuration as code, not infrastructure."
Of course this is just an opinion, but I think his comment was spot on and worth considering when weighing options like Ansible and Terraform. To relate it to the context of this post: most people compare Ansible with Terraform or Bicep. But I argue that NixOS is a much better tool to compare to Ansible, since they both fall into the configuration as code bucket (in my opinion).
Conclusion
After reading this post, I hope you will have a new perspective on configuration as code and maybe even give NixOS a try. It has changed how I configure my desktop, and after finally pulling the trigger on server deployments, I am even happier with the tool.